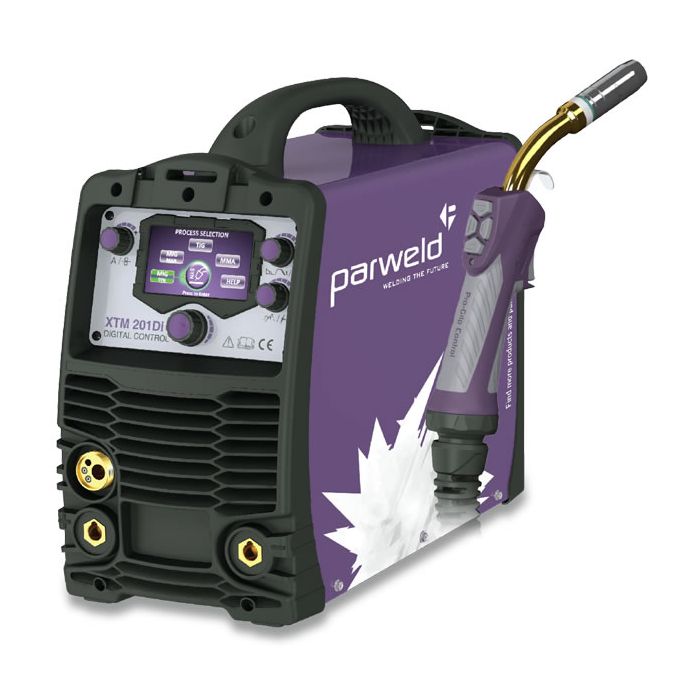
XTM Digital Multi Process Inverter
£1,038.35
£1,246.02
SKU
XTM201DI
ea (Each)
Hassle Free Returns
Parweld XTM 201 DI DIGITAL MULTI-PROCESS INVERTER
Introducing the new XTM 201 Di MIG, DC TIG or MMA, this machine does it all. Ideal for welding a range of materials, the XTM 201Di allows the welding of steels, stainless steels and aluminium using MIG, DC TIG or MMA processes.
The multi-language digital user interface rapidly gets you to the correct machine setting with minimal process knowledge, on site or in the workshop.
The helpful display guides the user through machine set up, from how to connect the machine for the chosen process, right through to the correct settings for the particular material thickness. The machine package includes a remote control MIG torch which allows MIG parameter adjustment directly from the torch.
Digital Interface
You can set up the XTM 201 Di with minimal effort – simply select your process, gas, material thickness and wire size and the machine automatically sets to the correct parameters for your job. You can then make adjustments using the control knobs on the front.
Image on screen shows how the machine should be set up correctly for the process selected.
Help section provides easy reference guide for replacement machine parts and torch consumables.
VOLTAGE
MIG 14.5-24V, TIG 10.4-18V, MMA 20.4-28V
DUTY CYCLE
200A @ 25%
INPUT CURRENT (MAX)
32A/16A
FUSE RATING
32A/16A
MACHINE TYPE
Inverter
KVA
3.7
STYLE
Compact
FEED BOX
2R
MAXIMUM CURRENT
140A/200A
INPUT VOLTAGE
230V 1P
SPOOL SIZE
100mm and 200mm
WIRE FEED SPEED
3.5-10m/min
WIRE SIZE
0.6 – 1.0mm
ENCLOSURE PROTECTION
IP23S
DIMENSIONS (MM)
490 x 220 x 430
WEIGHT (KG)
17.5
KEY FEATURES
• 110V/230V Single Phase
• 200A @ 25% Duty Cycle
• Compact and portable
• Dual digital display
• Accepts 5kg (200mm) spools
• 2T/4T trigger latching
• 3 years return to base warranty
• Manufactured to IP23S, ISO/IEC 60974-1, ISO/IEC 60974-6 and RoHS Compliant
TECHNOLOGY
MIG, MMA, TIG
| Weight | 0.000000 |
|---|